M3
Electronix Semiconductor Analyzer Kit
By
Chuck Hines, K6QKL
A workbench
instrument capable of testing transistors, diodes, FETs, etc., can be pretty
useful around the shack while constructing QRP circuitry.
Prevents a lot of remedial unsoldering later if you misidentify leads
and install a component backwards. Most all the semiconductor testers Ive used
over the past fifty years have commonly required that one first identify which
leads are what then insert the right leads into their proper socket slots
before applying power to actually begin testing the devices characteristics.
The M3 is different: No test sockets! Instead it has three grabbers. Hook each grabber to a different semiconductor
lead in any order you prefer without being concerned with which lead is a gate,
a collector, an anode. The two M3 printed
circuit boards include a pre-programmed microcontroller which sorts it all out,
does all the device, lead identification and testing work for you.
Then displays the results on an LCD.
Have an unknown device? Hook up
grabbers to your semiconductors leads and the M3 will display what the device
is, which grabber is hooked to what lead, and will display the devices essential
characteristics on the LCD. Powered by
a nine volt battery.
This isnt a
good/bad tester, NPN/PNP identifier, which-end-is-the-cathode sort of tool. A well designed quality instrument, it checks:
- Transistors, with or without
an internal protective diode or base to emitter resistor.
- Checks diodes, LEDs, diode
arrays, Darlingtons, both flavors of MOSFETs, junction FETs, Triacs, Thyristors,
and Unijunctions.
- Automatically identifies
pin-outs, finds internal shorts, measures leakage current, and lets you know
if a transistor has germanium or silicon inside while measuring the gain.
It is not an in-circuit
testing tool.
You can download
a copy of the Users Manual, and check out the rest of the functional details,
at: http://www.m3electronix.com/sa.html
Kit costs about
$55. A separate box for mounting your
instrument is an option for $7. The box arrives pre-drilled for mounting the
unit and LCD display screen. Has holes
for the grabber lines. Can be spray painted
whatever color you like. Kit parts were
well packaged in five bags. Six pages
of assembly instructions including graphics and diagrams make the soldering
job straightforward and linear.
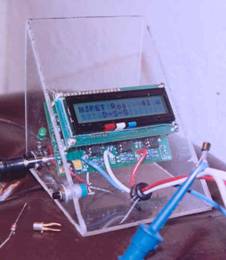 Made
a box for it from 3/32 Lucite Tuf® acrylic sheet stock from Lowes.
Cut it out with a scroll saw. Glued
box together with PROWELD from Hobby Lobby.
Results in a strong, durable, non-yellowing container.
Made
a box for it from 3/32 Lucite Tuf® acrylic sheet stock from Lowes.
Cut it out with a scroll saw. Glued
box together with PROWELD from Hobby Lobby.
Results in a strong, durable, non-yellowing container.
Bought
color-coded grabbers, matching insulated wire colors, and added bits of colored
tape to the base of the LCD bezel to provide an immediate visual identification
of the function of each test device lead. Added an LED and a series dropping resistor across
the power socket and used an old computer printers nine volt wall wart to power
the unit. I rarely test semiconductors
out in the woods, up on the roof, or while climbing trees so opted for the wart
instead of a 9V battery,
Additional
review of the kit is available [1]. A very nice machine.
[1] QRP Quarterly,
Vol 46, Number 3, Summer 2005, pp 54-55. W1HUE
 Made
a box for it from 3/32 Lucite Tuf® acrylic sheet stock from Lowes.
Cut it out with a scroll saw. Glued
box together with PROWELD from Hobby Lobby.
Results in a strong, durable, non-yellowing container.
Made
a box for it from 3/32 Lucite Tuf® acrylic sheet stock from Lowes.
Cut it out with a scroll saw. Glued
box together with PROWELD from Hobby Lobby.
Results in a strong, durable, non-yellowing container.